You can now also download the 3D model of Ironman. Ironman film standard Comes in following file formats: .obj .mb .3ds .max file - accurate -clean topology/geometry in quads -The model is subdivision ready smoothable to subdivide to a desired mesh resolution.
Wednesday, July 28, 2010
buy 3D model of Iron Man head
You can now buy 3D model of Ironman Head. Ironman Mark IV head subdivision model.Vray materials included, glowing eyes, volumetric lights. Also available in standard materials .max version.
Monday, July 26, 2010
Toy robot 3D model
High-poly 3D model of Toy Robot consist of 4 layers.
1. Body (for render)
2. Bones IK-animation.
3. Environment
4. hidden lights Two versions of texturing (2 max files)
1. Vray shaders*
2. Standart shaders *rendering are prepeared for Global Illumination v1.5 character support for merging, xref using and are SCALABLE!!!
in scene all bones are prepeared for animation (Inverse kinematic) head look at point.
all parts of characters UVW-unwrapped
max file 2OO9 version multisub material consist of 17 materials
enjoy!
High-Poly Nissan 350Z model
High-poly 3DS-MAX 5.0 model of Nissan 350Z roadster. The model was made from the real Nissan blueprints. By using Mesh Smooth modifier, you could change model quality. No boolean operations were used while creating the model.
Excellent 3D model of Porsche Boxter
High-poly model of Porsche Boxster. By using Mesh Smooth modifier you could change model quality. No boolean operations were used while creating the model.Materials created for Brazil render.
Sunday, July 25, 2010
High-poly and low-poly models of German Shepherd
High Detailed Realistic German Shepherd made with LightWave 7. The model is provided with high resolution color texture 2300x2300.
This pack includes two poses. Each pose is represented in lowpoly and highpoly versions.
This pack includes two poses. Each pose is represented in lowpoly and highpoly versions.
3D model of German Shepherd Skeleton
German Shepherd skeleton model is now available for download online.
3D model of Tom Cruise's head
High detailed 3d head model of Tom Cruise with hair can be downloaded from exchange3d.com and other online stores. Vray version of the model. The old Tom Cruise 3D mesh has been complete remodeled with realistic eyelashes, hair and beard. Diffuse, specular, normal and opacity maps. Beard is created using Hair and fur modifier. Eyes reflect like in real life and I added small veins to make them more similar to reality. Hair textures diffuse, and opacity are 1914x1000 pixels created with Wacom Bamboo tablet. Skin textures are 2048x2048. Initial geometry has been optimized to achieve a really fast and realistic render. Also available in standard materials and multiple formats.
Saturday, July 24, 2010
How to create a 3D model of treasure chest
Found this tutorial online today about creating 3D model of treasure chest. You can also buy 3D models of treasure chests at Exchange3D.com In this tutorial i will try to give you a few tips to consider when baking normal map and ambient occlusion for a low poly game asset.
First of all let's introduce our scene. The scene i've made available for download contains this:
- 1 high poly chest
- 2 low poly chests:
- one with smoothing groups(auto smooth around 50)
- one with only one smoothing group
- 2 low poly baking chests - both with the overlapping faces removed ready to bake the maps from the high poly
- one with smoothing groups
- one with only one smoothing groupYou can download it from here
3ds max 2010 scene -http://rapidshare.com/files/381980322/tc_start_tutorial.rar
obj format -http://rapidshare.com/files/381979137/tc_start_tutorial_OBJ.rar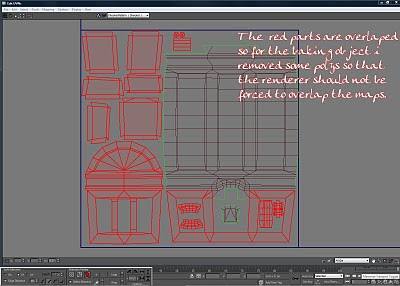
It is generally approved that for a game the props should have just one smoothing group. This is not entirely true. For old gen games and just for some engines this applies. For next gen games this applies only for some very weak engines. Unreal and crytech(the best engines in my opinion right now) don't have this limitation. This idea that one prop should have just one smoothing group appear also because for characters u'll use just one....but that's another story. If u have a continuous surface and with small angles between polys it is normal to have only one smoothing group...u wouldn't want to break...let's say a character face in 2 or more because of the sgroups...it will look bad as hell....but for a chest like this, or for a building or any other thing that has hard edges u should use smoothing groups. K. Back to our example.
If you look at my start image you will see that the chest in the middle has some serious problems...and all because it has only one smoothing group. One group means continuous surface....imagine that you will make an origami and never strengthen your edges...how it will look? At least odd. The difference between the left chest and the middle one is obvious. Now let's see how this will influence our baked maps. First step - Setting up the scene for baking
Usually i bake 3-4 maps for a prop - ambient occlusion, normal map, height map and a colored diffuse map to isolate different materials to easy up my texturing. Right now we will bake only 2. Ambient occlusion and normal map.
First of all change the renderer to mental ray. F10 or rendering menu - render setup and in the render setup chose from presets dropdown mental ray no gi. Also check the Enable Final Gather checkbox in the Indirect Illumination Tab and change the preset to low. And also in the Renderer tab change the Sampling Quality this way: minimum samples per pixel 1, maximum samples per pixel 16 and the type of filter to mitchell.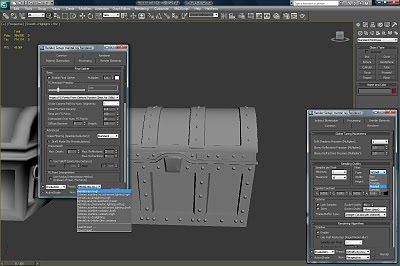 Next step is setting ur environment to white. Press 8 or go to rendering menu - environment. Change the background color to white and make sure no exposure control is activated. Also create a white diffuse standard material and assign it to chest_high.
 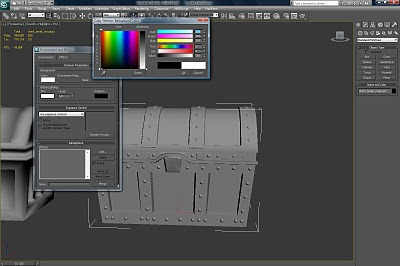 Now go to create - lights - standard - skylight and create a skylight. Check the use scene environment checkbox at the sky color tab.
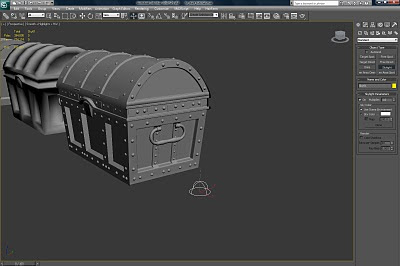 Now we are ready to bake.
Select chest_break_sgroups. Press 0(render to texture). Check the Projection Mapping enabled checkbox and pick the chest_high object as target. Don't worry about the distorted cage of the projection. We will repair it immediately. Go to projection modifier and in the cage tab hit the reset button. Then go to push and at amount insert 0.85.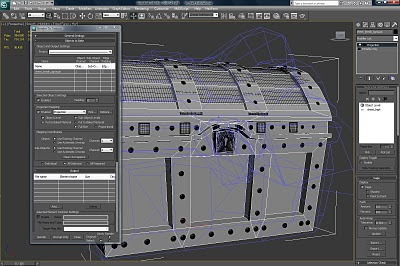
Now back to render to texture window. In the output tab add Ambient Occlusion(MR) and Normal Maps. Change the resolutions to 2048x2048 and also set a path were to save them(default path is ...project/sceneassets/images). Make sure both of them have a target map slot assigned. Hit render. Do the same thing for the chest_break_nosgroups.
This is what you should have now.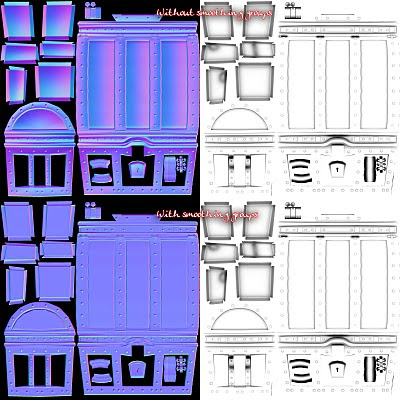 U can see that smoothing groups don't affect the aomap. But the normal map looks completely different. Those shades of pink and clear blue in the nosgroups nmap represent different illumination. THIS IS WRONG! Ok. Now u will say that this will compensate with the odd look of the nosgroups mesh....but no...you will see....it will just make it odder.
It's time to preview our baked maps.
Delete the skylight. Hide the high and the baking objects. Unhide the final layer.
Open material editor. The first 2 slots are some standard materials that i've applied to our low poly chests. First is for the nosgroups and the second for the one with smoothing groups. Go in materials and search for the direct x manager(if u have autodesk 3ds max design u won't find it...u'll have to find another way to preview ur mesh...a render perhaps). In the direct x manager select from the dropdown Metal Bump9 and make sure u check the Enable Plugin Material. No go in the DirectX Shader - Metal Bump 9 tab and add as ambient&diffuse texture the ambient occlusion and as normal bump the normal map. Do this for our both materials.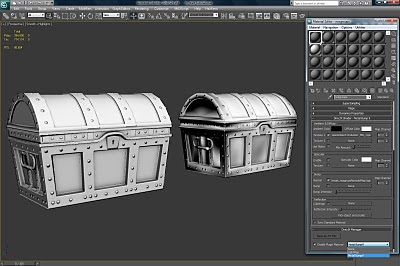 U see? The one in the right(the nosgroups) look ..."bleah!". That's why we need to bake them correctly. All we have to do now is to start making the textures. Use the aomap overlaying it with multiply over the diffuse and you can do beautiful things. This is what i've did with my chest. Hope you like it.
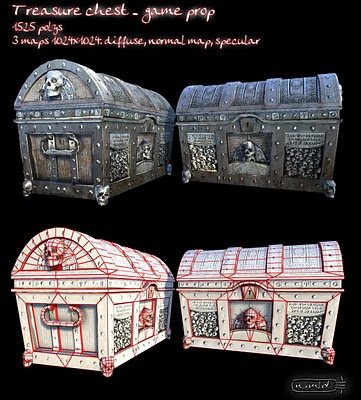
I hope this tutorial answered some of your questions and i really hope it helped. Until next time bye and i'll wait some texture variants for my chest...let's see what u can do :)
First of all let's introduce our scene.
 The scene i've made available for download contains this:
- 1 high poly chest
- 2 low poly chests:
- one with smoothing groups(auto smooth around 50)
- one with only one smoothing group
- 2 low poly baking chests - both with the overlapping faces removed ready to bake the maps from the high poly
- one with smoothing groups
- one with only one smoothing groupYou can download it from here
3ds max 2010 scene -http://rapidshare.com/files/381980322/tc_start_tutorial.rar
obj format -http://rapidshare.com/files/381979137/tc_start_tutorial_OBJ.rar

It is generally approved that for a game the props should have just one smoothing group. This is not entirely true. For old gen games and just for some engines this applies. For next gen games this applies only for some very weak engines. Unreal and crytech(the best engines in my opinion right now) don't have this limitation. This idea that one prop should have just one smoothing group appear also because for characters u'll use just one....but that's another story. If u have a continuous surface and with small angles between polys it is normal to have only one smoothing group...u wouldn't want to break...let's say a character face in 2 or more because of the sgroups...it will look bad as hell....but for a chest like this, or for a building or any other thing that has hard edges u should use smoothing groups. K. Back to our example.
If you look at my start image you will see that the chest in the middle has some serious problems...and all because it has only one smoothing group. One group means continuous surface....imagine that you will make an origami and never strengthen your edges...how it will look? At least odd. The difference between the left chest and the middle one is obvious. Now let's see how this will influence our baked maps. First step - Setting up the scene for baking
Usually i bake 3-4 maps for a prop - ambient occlusion, normal map, height map and a colored diffuse map to isolate different materials to easy up my texturing. Right now we will bake only 2. Ambient occlusion and normal map.
First of all change the renderer to mental ray. F10 or rendering menu - render setup and in the render setup chose from presets dropdown mental ray no gi. Also check the Enable Final Gather checkbox in the Indirect Illumination Tab and change the preset to low. And also in the Renderer tab change the Sampling Quality this way: minimum samples per pixel 1, maximum samples per pixel 16 and the type of filter to mitchell.
 Next step is setting ur environment to white. Press 8 or go to rendering menu - environment. Change the background color to white and make sure no exposure control is activated. Also create a white diffuse standard material and assign it to chest_high.
  Now go to create - lights - standard - skylight and create a skylight. Check the use scene environment checkbox at the sky color tab.
 Now we are ready to bake.
Select chest_break_sgroups. Press 0(render to texture). Check the Projection Mapping enabled checkbox and pick the chest_high object as target. Don't worry about the distorted cage of the projection. We will repair it immediately. Go to projection modifier and in the cage tab hit the reset button. Then go to push and at amount insert 0.85.

Now back to render to texture window. In the output tab add Ambient Occlusion(MR) and Normal Maps. Change the resolutions to 2048x2048 and also set a path were to save them(default path is ...project/sceneassets/images). Make sure both of them have a target map slot assigned. Hit render. Do the same thing for the chest_break_nosgroups.
This is what you should have now.
 U can see that smoothing groups don't affect the aomap. But the normal map looks completely different. Those shades of pink and clear blue in the nosgroups nmap represent different illumination. THIS IS WRONG! Ok. Now u will say that this will compensate with the odd look of the nosgroups mesh....but no...you will see....it will just make it odder.
It's time to preview our baked maps.
Delete the skylight. Hide the high and the baking objects. Unhide the final layer.
Open material editor. The first 2 slots are some standard materials that i've applied to our low poly chests. First is for the nosgroups and the second for the one with smoothing groups. Go in materials and search for the direct x manager(if u have autodesk 3ds max design u won't find it...u'll have to find another way to preview ur mesh...a render perhaps). In the direct x manager select from the dropdown Metal Bump9 and make sure u check the Enable Plugin Material. No go in the DirectX Shader - Metal Bump 9 tab and add as ambient&diffuse texture the ambient occlusion and as normal bump the normal map. Do this for our both materials.
 U see? The one in the right(the nosgroups) look ..."bleah!". That's why we need to bake them correctly. All we have to do now is to start making the textures. Use the aomap overlaying it with multiply over the diffuse and you can do beautiful things. This is what i've did with my chest. Hope you like it.
I hope this tutorial answered some of your questions and i really hope it helped. Until next time bye and i'll wait some texture variants for my chest...let's see what u can do :)
TACTIC 3.0, at SIGGRAPH 2010
Southpaw to unveil new Digital Asset Management Solution, TACTIC 3.0, at SIGGRAPH 2010.
The main focus of TACTIC 3.0 is flexibility. Its features include:
- More intuitive and flexible interfaces that allow users to develop personalized screens to meet their unique workflow
- A powerful expression language that enables studios to mine and track production information from any internal system or application
- New and completely customizable reporting, scheduling and workflow features that transform mined data into useful, user friendly production information
- New integrations with the compositing application NUKE, the Adobe suite of creative tools, the Rush render queue system (beta) and IRIDAS FrameCycler (beta). TACTIC 3.0 will be on display at Southpaw’s SIGGRAPH 2010 booth, #205.
Southpaw Technology will unveil TACTIC 3.0 at SIGGRAPH 2010. The new version will provide studios with a more open, flexible solution for speeding the creation of digital assets across highly complex digital productions, like those found in feature film, visual effects, animation, and cinematics.
TACTIC is four solutions in one. It combines asset management, workflow management, project management and communication tools into one dynamic Web-based, cross-platform solution. Battled-tested in some of the most demanding environments, TACTIC enables vast teams of artists and animators to work with terabytes of digital assets the way they want to, rather than forcing them into a specific workflow.
TACTIC 3.0 features:The main focus of TACTIC 3.0 is flexibility. Its features include:
- More intuitive and flexible interfaces that allow users to develop personalized screens to meet their unique workflow
- A powerful expression language that enables studios to mine and track production information from any internal system or application
- New and completely customizable reporting, scheduling and workflow features that transform mined data into useful, user friendly production information
- New integrations with the compositing application NUKE, the Adobe suite of creative tools, the Rush render queue system (beta) and IRIDAS FrameCycler (beta). TACTIC 3.0 will be on display at Southpaw’s SIGGRAPH 2010 booth, #205.
3D model of Triumph motorcycle
Barried on 3rd page of results in google, there is this high-poly 3D Model of Triumph motorcycle
More 3D models of Triumph motorcycles for download.
3D model of P12 Fighter
Another crazy awesome motorcycle 3D model for download from exchange3d.com. This is a 3D model of Confederate P120 Fighter
The model was made in 3DS Max, and is available in .3ds, .max, .c4d and .obj formats. All objects are modelled with polygonal surfaces. Fully detailed and textured. The detail is high enough for close-up renders. Both standard and Brazil r/s materials included. No further adjustments ,changes or plug-ins needed to use the model. The scene contains a total of 105,000 faces. TurboSmooth or MeshSmooth can still be applied in most parts for a higher polygon count.
Look for more 3D Studio MAX models.
Thursday, July 22, 2010
Low poly collection of 3D models
If you are ever in search of low poly 3D models. Do not go to turbosquid.com, try exchange3d.com instead. Just type "low poly" in the search box. Some more examples of low poly model collections on Exchange3D: Low poly cars by be_fast, a low-poly model of a man by EvgenijKo, and low-poly model of a soldier by Rembex.
3D model of Hovercraft for download
Check out 3D model of hovercraft by Stefano Tartaroti (aka tartino). About this 3D model: Rescue hovercraft or scientific research hovercraft. Only cinema4d r10 format has materials like preview images. Polygons 29355 Vertices 30039. The model can be downloaded from www.exchange3d.com and turbosquid.com
Try Chicken
|
Advanced 3D model catalog search
Cannot find the model you need at Turbosquid? Try advanced 3D model catalog search on exchange3d.
3D Model of Living room 0176
You can now download 3D model of Living room online from Exchange3D.com
Description of the model: The Design of the interior. Models possible to use in any project, since they are made with real prototype from catalogue of furniture. Final images rendered with Vray 1.50.SP2.
Download 3D models by allenpan online.
3D model of Ducati 250 Desmo bike
CG artist Gonzalo Samaniego has published a 3D Model of Ducati Desmo 1971 in Exchange3D media store.
Ducati 250 350 Desmo The model was made in 3DS Max, and is available in .3ds, .max, .c4d and .obj formats. All objects are modelled with polygonal surfaces. Both standard and Brazil r/s materials and bitmaps included. The model is quite detailed and it includes a fully modelled engine, levers and cables, gauges, throttle, fuel tank caps, lights, etc. The tyre treads are also modelled. The scene contains a total of 96,000 faces. TurboSmooth or MeshSmooth can still be applied, in most parts of the model.
Check out more 3D models by Gonzalo Samaniego
3D Model of Ducati Desmo 1971
CG artist Gonzalo Samaniego has published a 3D Model of Ducati Desmo 1971 in Exchange3D media store.
Ducati 250 350 Desmo The model was made in 3DS Max, and is available in .3ds, .max, .c4d and .obj formats. All objects are modelled with polygonal surfaces. Both standard and Brazil r/s materials and bitmaps included. The model is quite detailed and it includes a fully modelled engine, levers and cables, gauges, throttle, fuel tank caps, lights, etc. The tyre treads are also modelled. The scene contains a total of 96,000 faces. TurboSmooth or MeshSmooth can still be applied, in most parts of the model.
Check out more 3D models by Gonzalo Samaniego
Ducati 250 350 Desmo The model was made in 3DS Max, and is available in .3ds, .max, .c4d and .obj formats. All objects are modelled with polygonal surfaces. Both standard and Brazil r/s materials and bitmaps included. The model is quite detailed and it includes a fully modelled engine, levers and cables, gauges, throttle, fuel tank caps, lights, etc. The tyre treads are also modelled. The scene contains a total of 96,000 faces. TurboSmooth or MeshSmooth can still be applied, in most parts of the model.
Check out more 3D models by Gonzalo Samaniego
Wednesday, July 21, 2010
3D model of spiderman by Gonzalo Samaniego
CG artist Gonzalo Samaniego added a 3D model of Norton 850 Commando to the exchange3d.com online store today.
Norton 850 Commando The model was made in 3DS Max, and is available in .3ds, .max, .c4d and .obj formats. All objects are modelled with polygonal surfaces. Both standard and Brazil r/s materials and bitmaps included. The model is quite detailed and it includes a fully modelled engine, levers and cables, gauges, throttle, fuel tank cap, lights, etc. The tyre treads are also modelled. The scene contains a total of 97,000 faces. TurboSmooth or MeshSmooth can still be applied, in most parts of the model.
Check out other 3D models by Gonzalo Samaniego
3D model of spiderman
Anyways, check out this 3D model of Spiderman by Fabelar that was published on exchange3d marketplace recently. Fabelar is an awesome CG artist who has made quite few 3D models of various people and characters. All of Fabelar's models are available for sale at various websites online including exchange3d.com marketplace. The rigged version is rigged with biped with skin modifier applied in 3ds Max 9. The model is very easy to animate, the poses you can see as previews has been set in a few minutes.
You can see more 3D models by the same artist on exchange3d.com: Fabelar's 3D models on exchange3d.com .
Subscribe to:
Comments (Atom)